Showing posts with label fabric. Show all posts

Friday, 14 August 2015

Fabric Doll House Number 1 Done :)

Today I finished my first doll house so 1 down 1 to go :D  I put the rest of the little house together and put a little strap with a snap button to close it.  Here are some pictures of the finished product :)
Here is the little house all finished.

This is how it looks when you open it up. There is the little doll watching tv :D

Here she is taking a cake out of the oven :D

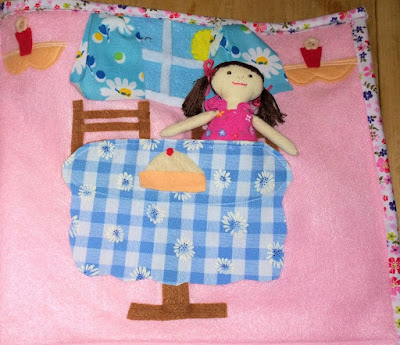
Sitting at the table ready to eat cake :)

Now shes ready for a bath :D

You fold the part with the dining room and bathroom over and there is her bedroom.

Here she is taking her pjs out of the wardrobe.

Cozy in bed :)

Next day it is time for a picnic :)

This little house was very fun to make and I hope it will make my nieces happy little girls at Christmas time :) for links on the examples of take along fabric doll houses I liked see this post, take-along-fabric-doll-house.

© Copyright 2015 by Sew Adorable Dolls. All rights reserved

Wednesday, 5 August 2015

The Car Caddy :)

Another project I worked on last year for my nephews were car caddies.  I made 3 of these and they were very very fun to make :) I googled car play mats to get ideas of what I could add to my car caddies and found a lot of very creative ideas :)  I liked the look of the car caddy on this page, The Imagination Station.  She's got a very good tutorial on there with pictures.  I made my own pattern for mine.  I made them into pouches with handles and personalised them with my nephews' names.  I made each with a different fabric and the play mat itself was done in felt.  I lost my pictures so only have pictures of one of them to show you.
This is how my car caddy looked when it was closed :)  It had a velcro fastener and the letters for my nephew's name were made out of felt with my handy dandy BIGkick machine. 

This is how it looked when it was half way opened. There are 3 velcro fasteners to keep it neatly closed.

This is the caddy when I was making it.  I hadn't yet added the street lines and hadn't finished adding the different buildings or the flap where the cars would be stored.

This is how the car caddy looked when I was finished.  The mat on the playing side was all done in felt.  It's a big piece of green felt for the background, black for the streets and other different colors for the buildings.  The street lines were made with yellow embroidery thread.  I also embellished the mat with little felt trees and street lights.

I made a police station which was sewn on the mat with the bottom left unsewn so the car could be put in.  The McDonald's  building is a drive thru :D  I sewed it on the mat on the top and bottom left the sides open so the cars could drive thru :)

There was a garage also with a gas and air pump and a car wash that was also a drive thru :)  
The school, hospital, fire station and HEB grocery shop all had the bottoms open so the cars could be driven in.

This is the flap where the cars are stored.  I decided to make it look like little houses where the cars live :D  The top of the houses was left open so the cars could drive out.

They were very fun to make and the boys liked them a lot.  A very good Christmas present idea :)
I'll share more of last years presents in another post and will also share my new project for the next set of Christmas presents for this year :)

© Copyright 2014-2015 by Sew Adorable Dolls. All rights reserved.

Tuesday, 4 August 2015

The Coloring Book Carrier

Last year I decided I was going to make some of the presents we were going to take for our nephews and nieces in Texas.  There are 14 soon to be 15 kids in Texas and 1 here in the UK.  That's a lot of presents :D soooo I decided to make some of the presents last year and am doing the same this year :)
I wanted to share with you what I made for them last year.  I made 4 different projects.  The first project was the coloring book carrier.  I made 4 of these for 4 of our nieces.  They liked them :)  I got the idea from a picture I saw on pinterest.  The tutorial I used came from CRAZY little PROJECTS.  Her tutorial is great and has pictures.  I made mine for 24 crayons.  I took pictures of my 4 when I was finished but I can't find my pictures now :( only a couple of pictures of one of them.
Here it is.


They were fun to make. Was fun choosing all the different fabrics to use.  I decided to personalise each of them with the girl's names.  I embroidered their names on a piece of fabric which I then sewed onto the carrier and then embellished them with appliques I made with my BIGkick machine but since I lost y pictures I can't show you that.  We got crayola colors, coloring books and note pads to put in them.  When miss Lilah-Mai gets a bit older I'll be making her one of these :) 


Friday, 24 July 2015

Little Fabric Doll House

After I had made the dolls I've showed you I decided to try something different.  I wanted to make something like what I'd found here Pretty Prudent.  I absolutely am in love with the idea of a dollhouse in a vintage suitcase :)  I don't have a vintage suitcase though :D So as it often happens when my mind is full to the brim with crafty ideas I couldn't sleep one night and an idea was born :D
I decided to go ahead and make my own flat doll house and put it together like a book :) It was massive fun to make :D  I used my sewing machine, my handy glue gun, my trusty BIGkick machine, a lot of felt squares and fabric, plus that sturdy interfacing stuff I don't know the name of sorry.  I'll put a picture of it here see if you can get an idea of what it is.

Each panel of my flat house was made with a felt square for one side, fabric for the other side and the sturdy interfacing in the middle to make it stiff.  I made a living room, kitchen, dance room, bedroom and a backyard.  The outside of the flat house I made to look like the front and back of a house and I made it some handles to make it easy to carry around.  I also made a Waldorf inspired mini doll named Molly :) and a little boy doll.  The house is decorated mostly with felt pieces either glued or sewn on.  Molly was 5 1/2 in. tall and made with my own pattern.  She had 4 outfits and the house accessories were 3 floor mats, a teddy bear, a picnic blanket, 2 plates, 2 pb&j sandwiches and 2 glasses of milk.  I'll share some pictures with you. :)

Molly's House
 This is Molly.
Front of Molly's house.
 Back of Molly's house.
Pouch I made for all the little accessories and the doll.

The first scene was the living room :)
2nd scene was the kitchen.
3rd was a ballet dance room.  I used shiny card to make the mirror :)
4th scene was the bedroom.  The wardrobe opens and it had a pouch for Molly's clothes and the little bear can be removed from its basket :)
Molly and bear tucked in bed :)
The last scene was the backyard.  This is Molly and her friend having a picnic :)
 I made plates, pb&j sandwiches and glasses of milk for their picnic :)

I loved making this house and plan to make another one :) There is no tutorial to link you to because this was my idea and I did not write one.  I don't know that I would know how really :) It was fun sharing it here.

© Copyright 2013-2015 by Sew Adorable Dolls. All rights reserved.

Monday, 20 July 2015

Some other dollies

I wanted to share some other dolls that I've made.  After the first 2 dolls I made a few more using the same pattern that I found here sarahs-dolls.  I made a superboy, a schoolgirl, a pirate, some little boy and girl dolls and a little girl doll in a Christmas dress.
Here are some of them.


I think my favorite was the schoolgirl doll :)  I made some of these dolls about 3 years ago, some 2.  Most of these were sold on my FB page.  They were very fun to make, especially the pirate and the schoolgirl :) I loved making their outfits as well.  I used all kinds of fabrics and felt.  The hardest thing to make for me was the newspaper boy hat.  It came out ok though.  After I got the hang of making this type of doll I decided a jointed doll was my next project.  I'll share some of those in another post :)

Sunday, 19 July 2015

Lilah's baby blankets

When Emily got pregnant I decided to make her baby a cot blanket.  She decided she wanted the sex of the baby to be a surprise so I had to choose a unisex fabric.  I decided on an animal circus panel, so it wasn't hard to put together at all.  I started it when she still had some months to go before she had the baby.  I had to leave it unfinished until the baby was born because I wanted to embroider the baby's name on the blanket.  As we waited for the baby to come I sewed around the animal pictures on the blanket.  When Lilah-Mai finally came I was able to embroider her name on her blanket and we gave it to her for Christmas :)
You can see part of it here :)

Another blanket type thing I made for Lilah was a car seat blanket I made from this site imperfect homemaking.  She's got a great tutorial with pictures.  Emily chose the fabrics and it came out nice :)
Here it is! Lilah snug as a bug in a rug :) <3

The last blanket I have to show you was a very fun project to make.  I found this one here small town small budget.  She's got a great tutorial on there :) It's a good project to use up fabric and ribbon scraps :)  It's a blanket made with fabric and oil cloth and batting.  She made flaps on her blanket decorated with ribbon hoops for the baby to play with.  Under the flaps were family pictures and she made her blanket fold like a bag.  
I made mine with a cotton print fabric, pink polka dotted oil cloth and light pink fleece.  I made 11 flaps out of the fleece for my blanket.  Under each flap I put pictures of Lilah with her mum and dad and also with her pup, Marley.  I made some number stencils and cut numbers out of fabric to sew on each flap.  I also made some felt appliques with my handy dandy BIGkick die cut machine.  On each flap I put 3 ribbon loops made with different ribbons.  I put batting between the fabric and the oil cloth to make it cushiony and sewed bias tape all around to finish it off.  I did not make mine to close up into a bag though.
Here it is!

 
Awwwww, my gorgeous little baldy pants when she was a tiny baby still :) <3


Saturday, 18 July 2015

Mini suitcase

A while back I found the most perfect project to make.  It was a doll house in a suitcase :) hart and sew.  It's amazing and I love the idea.  It was my inspiration to make my own flat doll house :)  I'll share that in another post.  A couple of weeks ago I was googling doll houses in suitcases and I found this quilted suitcase tutorial.  I liked it a lot for Lilah's doll stuff :)  It's a good tutorial with pictures.  Her little suitcase is lovely.  I made quite a few mistakes with mine.  I think it is mainly due to the fact I didn't have a pattern.  I work better with a pattern.  In the end I had to take out the zipper and added some flaps with velcro instead.  There is a suitcase pattern I want to purchase though.  It's this one the sidekick mini suitcase.  I want to try and make another one with this pattern to see how it goes.
To make Lilah's case I used cotton printed fabric, felt, velcro, bias tape and a very sturdy interfacing I do not know the name of, sorry.  I followed the instructions as best I could from quilted suitcase tutorial but added flaps to the sides and the front to put velcro instead of a zipper.  The end result was ok I think, seeing as it was my first ever time making a mini suitcase.
Here it is!


Lilah liked it and was calling it her bag :) I'm having a lot of fun creating stuff for this little princess.

Wednesday, 15 July 2015

New Outfits

I love to sew and having a little girl to sew for here in the UK is great :) I made Lilah 2 new dresses and a shorts set and one with little capris, all with their own hair bow :)  They were all fun to make and it was fun choosing the material to use.  I think I'm seriously depleting my fabric stash.  I will need to do more fabric shopping soon :)  I went looking online for toddler clothes to make and found so many great tutorials and patterns.  I had to make a 'for Lilah' folder on my laptop to have all my favored ones I want to make in one place.
The first dress I made her came from a Simplicity pattern I already had from a few years ago and I think it came out ok.  I love the fabric I chose for this dress.  It was fun and simple to make.  The only problem area for me was the the slit at the collar.  Turning that over was difficult for me.  I'm not sure I did a great job there, but all in all it turned out nice I think.
This is the dress and the British Princess in it :D


The next one I made was a pillowcase dress.  I looked at a lot of different sites to see if everyone made them about the same way.  I chose for the love of craft to make a size 2T dress, so it's still a bit big on her but I think it'll still fit ok next summer :)  That one came out very nice I think.  It was so easy to make and even though it was a bit big, she still looked pretty when she tried it on.  The bloomers came from Sewing Mama Raeanna.  She has a free pattern to use and has pictures of different bloomers she's made :)  
Here it is!

After these I wanted to make her some shorts to wear because it was sunny out, and here in the UK the minute the sun comes out people want to put on summer clothes.  I found some cute things to make for Lilah-Mai :)  I knew I wanted to make her a pinafore dress or blouse, so as I was looking for the one I liked most I found a very cute tunic top to make her.  It's from Shwin and Shwin.  It's called the black bird tunic and it's lovely.  She's got a great free tutorial and pattern there.  The only thing I didn't do was the piping.  The shorts I got from Caila Made.  She's got a free pattern and tutorial.
Here it is and Lilah wearing it :) 


And last is the pinafore I found with some little capris :)  I chose Second Sister.  She's got a free pattern for it there.  It's very sweet and cute :) and Lilah looked adorable in it.  And it's reversible!  I only have a pic of one side though.  For the capri pants I just used the summer shorts pattern I got from Caila Made and made them longer.  I also added some ties to the sides at the bottom.  
Here it is!

We will see what I make next :)